Decision Tree Node
![]()
The Decision Tree Node is commonly used across processes that are used to filter records through exclusion logic, apply a dynamic segmentation or decide what kind of content a person is going to receive in a tweet, email, or personalized web experience. As the node is a generic piece of logic, it has a wide range of uses and applications.
General usage:
- Each column is called a 'characteristic' and each row within a branch is a Condition
- Similar to the Columnar Table, this node executes from left to right and top to bottom
- The values supplied to each characteristic are controlled when the Decision Tree Node is placed into a graph
- As the Decision Tree Node executes each of the characteristics, branches and conditions, the first combination that executes true will return it's corresponding result and all other rules will not be executed. Hence, it is always best to have your strictest decisions on the top of each branch
- A catch-all condition Else branch is provided by default - it is not necessary to have a condition in this case the evaluation passes straight through to the next condition - this is equivalent to the blank cell in the Columnar Table
- Each decision if evaluated to true can be used to set one output results
Image: The example above shows a sample segmentation based on the Gender, Age and Shoe Size of a customer shown in the left-most three columns. The segmentation outcome is shown in the Results column on the right. 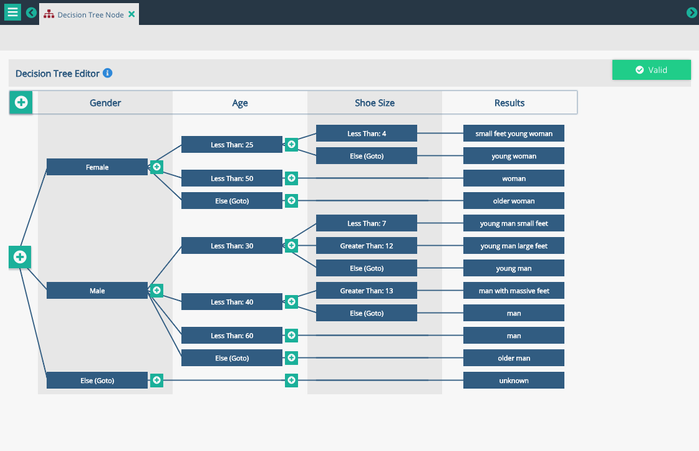
Creating A Decision Tree Node
Step 1: Select Create and choose the 'Decision Tree' node in the 'Logic' section
![]()
Step 2: The Decision Tree starts with one characteristic and one branch, as below. New characteristics and conditions to evaluate can be added by clicking the 'Add Characteristic' button at the top left of the window. This will prompt for the decision characteristic name which is shown at the top row.
Image: Starting point for when new Decision Trees are created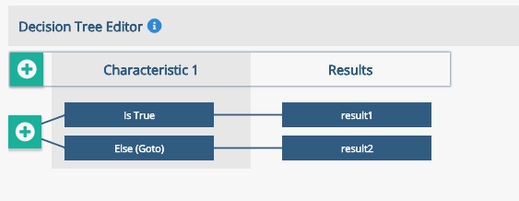
Image: After selecting 'Add Characteristic', a pop-up will ask what name the decision will be called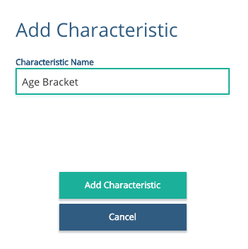
Image: After adding the Age characteristic, a new column will get added to the right, before the results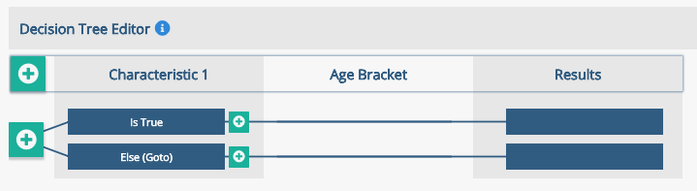
Step 3: After adding a characteristic, you can add branches and conditions to evaluate by clicking the  icon placed throughout the decision tree
Image: Creating a new branch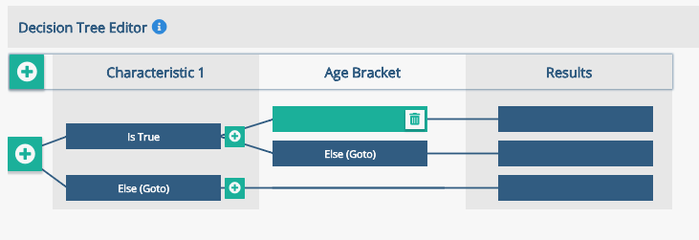
Step 4: After a new branch is created, you can select the dark boxes to put in a condition to evaluate.
Image: The Condition for Evaluating Gender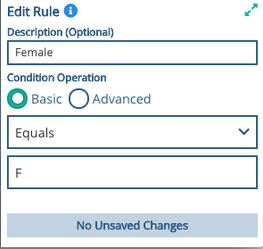
Step 5: Add results, which can be in the form of literals (hard-coded / static), a section of your schema or a field in your schema (dynamic)
Image: The example above shows a sample segmentation based on the Gender, Age and Shoe Size of a customer shown in the left-most three columns. The segmentation outcome is shown in the Results column on the right. Each Characteristic has a minimum of two branches. There is always a catch-all branch called 'else' which will always be chosen if none of the preceding conditions is true.
Step 6: For each characteristic created, a data source must be added in the list of parameters outside of the node at the graph level
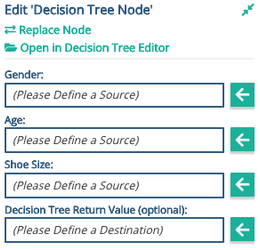
Image: To use the Decision Tree Node in a graph it is necessary to map all of the named Characteristics to schema, public variable or literal values. These are configured in the usual way in the right hand panel when the node is highlighted in the graph.
Validation Warnings
| Warning | Note |
|---|---|---|
| All decision tree result destination must be valid data reference formats | The results returned can either be strings or json objects and cannot be blank. |
| All decision tree condition nodes must be valid javaScript or 'else' | A condition node needs to have valid JavaScript in order to evaluate if a condition is true or not. If no conditions are needed, simply delete the branch so that it will evaluate true. |


See Also:

Privacy Policy
© 2022 CSG International, Inc.