Columnar Table Node
- Atul Dattatray Bhujbal
- Neil Skilling (Deactivated)
- Austin Lohr
Purpose
The Columnar Table Node allows complex decisions with multiple inputs and outputs to be created easily. Essentially, it is a visual interface that can hold many if-then-else statements in one place to evaluate rules and make decisions.
Recommended places to use this node:
The columnar table is commonly used across processes that are used to filter records through exclusion logic or decide what kind of content a person is going to receive in a tweet, email, or personalized web experience. As the columnar table is a generic piece of logic, it has a wide range of uses and applications.
General Usage:
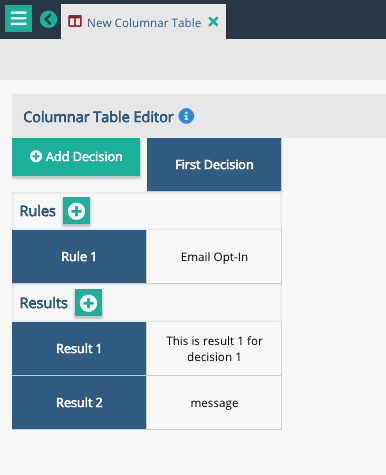
- In the columnar table, each column is called a 'decision', each row is called a 'rule' (i.e. - input), and each row after the 'results' row is called a 'result' (i.e. - output)
- Columnar tables are particularly good for the circumstances where you may have a large number of input fields, but the combination of decisions is quite sparse compared to the number of combinations. It is good practice to have a catch-all rule where all rules are blank (and hence true) to ensure that a result is always generated
- All decisions are evaluated left-to-right and the rules in a decision are evaluated from top-to-bottom
- A blank rule will accept any input and will always return true
- Each decision if evaluated to true can be used to set multiple output results
- The first rule where all rules are true is the decision and any decision that is placed after will not be evaluated. Hence, it is always best to have your strictest decisions on the left

Creating a Columnar Table
Step 1: Select Create and choose the 'Columnar Table' in the 'Logic' section
![]()
Step 2: The columnar table starts blank, as below, new decisions can be added by clicking the 'Add Decision'. This will prompt for the decision column name which is shown at the top of the table.
Image: Starting screen for Columnar Tables
Image: After selecting 'Add Decision', a pop-up will ask what name the decision will be called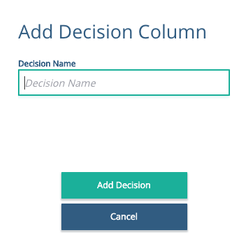
Image: After assigning a name to the decision, the name will appear to the first empty column on the right
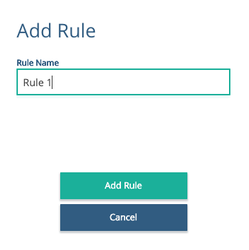
Step 3: After adding a decision, you can select the  icon next to 'Rules' to add a new rule that needs to be evaluated.
Image: After selecting the plus icon next to 'Rules', a pop-up will ask what name the rule will be called
Step 4: After a decision and a rule have been made, select the white, open space between the rule and decision to put in the evaluation logic.
The criteria for the decision and the rule intersection is a JavaScript expression entered into the Edit Rule panel on the right hand side of the screen.
Image: Using the 'Basic' window to add a rule that evaluates whether or not the customer has opted-in to receive email communication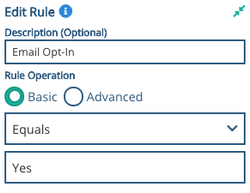
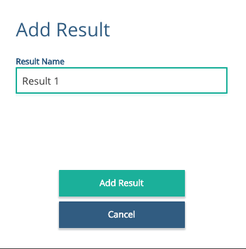
Step 5: After a decision, a rule, and the evaluation logic have been created, add the results to generate the desired outputs if a decision evaluates to true.
Results are added to the decision table by clicking the plus icon ( ) next to the Results label.
The value for the Result for a particular column can be a literal value, a schema location or a public variable. The Result Value set via the panel on the right hand side of the screen.
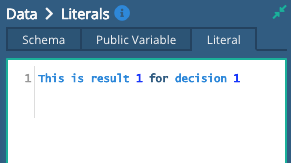
Clicking in the result box for that decision will show the current value in the Edit Result Value and Schema, Literal or Public Variable chooser.
Step 6: For each characteristic created, a data source must be added in the list of parameters outside of the node at the graph level
Validation Warnings
| Warning | Note |
|---|---|---|
| A columnar table must have at least one column | No decision columns have been created. Use the Add Decision |
| A columnar table must have at least one rule | A decision column has been created but no rule has been added to the table |


Errors
![]()
- ColumnarTable unable to find value for rule with this data source - this means that the incoming data did not contain the expected value in the schema or public variable
See Also:
- Troubleshooting and Debugging
- Business Logic Nodes
- Columnar Table Node
- Decision Tree Node
- 2D Table Node
- Conditional Node
Related content

Privacy Policy
© 2022 CSG International, Inc.